Track box failures are one of the most common ways foil boards die. Everyone here who’s been foiling more than a few seasons has either experienced one or knows someone who has.
Yet the how-to of track box installation is probably the least-discussed topic on the internet. Builders keep their methods close to their chest. I’ve had boards melt down in fewer than 5 sessions — open them up and find what I can only describe as “a band of mutant trolls under the hood.”
Traditional surfboard builders would sometimes just drop two tracks into beer cooler EPS foam with zero reinforcement and call it done. Today’s production boards are likely better — but how much better?
People have paid thousands and had their boards fall apart in a season. It’s time builders share how they’re reinforcing their tracks as a staple of board building quality.
There’s been a lot of great discussion lately about stiffness — the Tuttle thread is excellent and addresses what may be the ultimate solution for stiffness. But that’s a different conversation. This thread is about dual track box installation: what goes inside, how it’s reinforced, and why it matters.
Here’s a complete description of the system I’ve been building and refining. I’m not claiming it’s the most robust design out there — my criteria were simplicity, low cost, and effectiveness. But it works, and it’s a starting point for a conversation I think is long overdue.
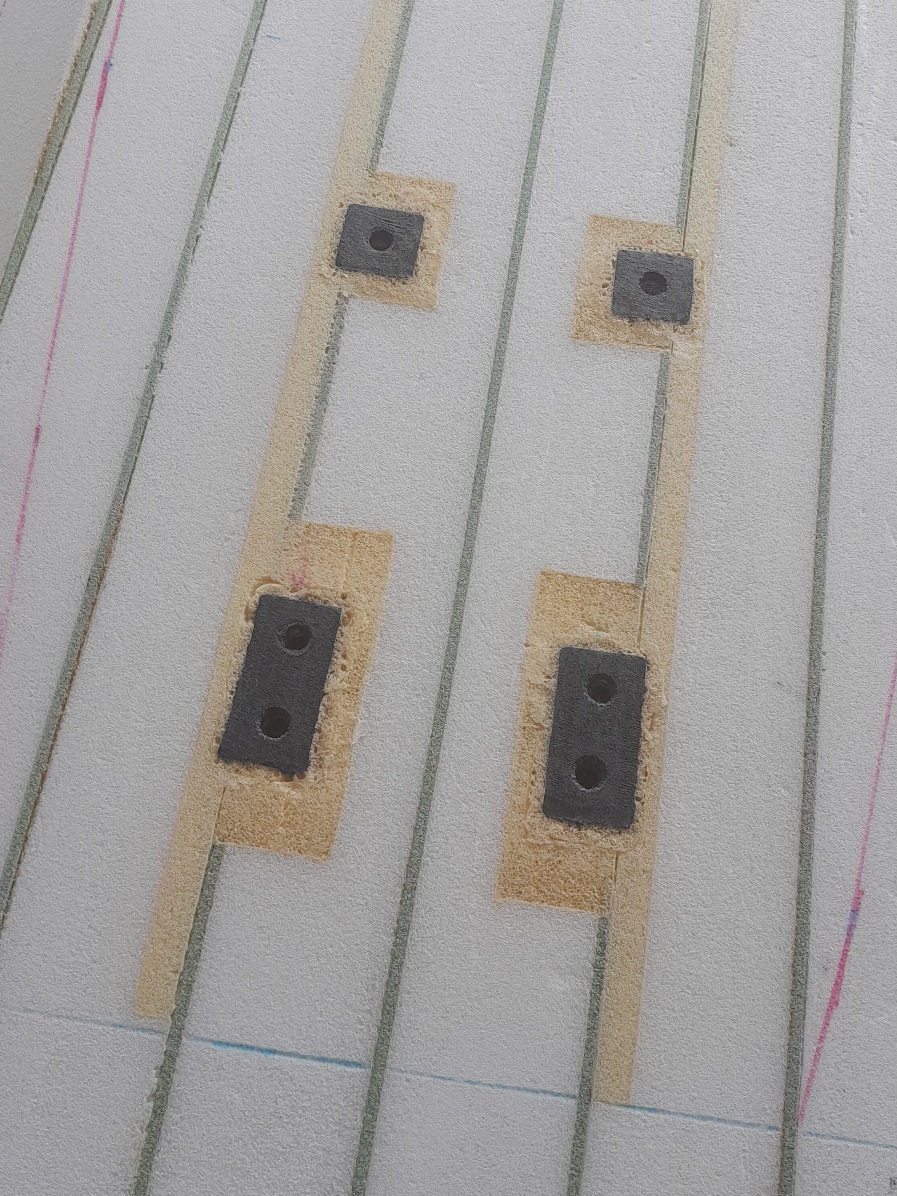
The core of this system is a high-density Divinycell cassette — 30cm long × 15cm wide × 6cm thick — housing two 3×3cm high-impact plastic track inserts running nose to tail, 9cm center to center. The cassette sits flush against the bottom carbon laminate and is surrounded by a 9cm XPS foam core above.
Ten carbon fiber arrow shafts are installed as structural pillars in two roles. Four outer pillars (green) are 12cm long and brace directly against the track bodies, transferring lateral and vertical loads into the structure. Six inner pillars (blue) run the full 15cm from the bottom skin to the inner carbon layer of the standing deck sandwich — effectively stitching the bottom and top laminates together through the core. All pillars terminate at the base of a top deck sandwich: carbon fiber, 3mm H80 Divinycell, and a final carbon outer skin.
The result is a highly triangulated, load-distributing structure that prevents the track flex, delamination and foam crushing that cause most track box failures.
Arrow shafts are inexpensive, widely available, and fast to install. This isn’t the only way to reinforce a track box — it’s one practical approach. Curious what others are doing inside their builds, or seeing inside the boards that are failing.
I tried your carbon arrow method last year on a board: on a 1 lb EPS with a full sandwich construction. Installing the carbon arrows was easy. Building wise, the big advantage over HD foam inserts is that it saves you from making the big plunge cut needed to fit the insert. For me, that’s always a bit of a struggle and it’s never perfectly clean on thick board.
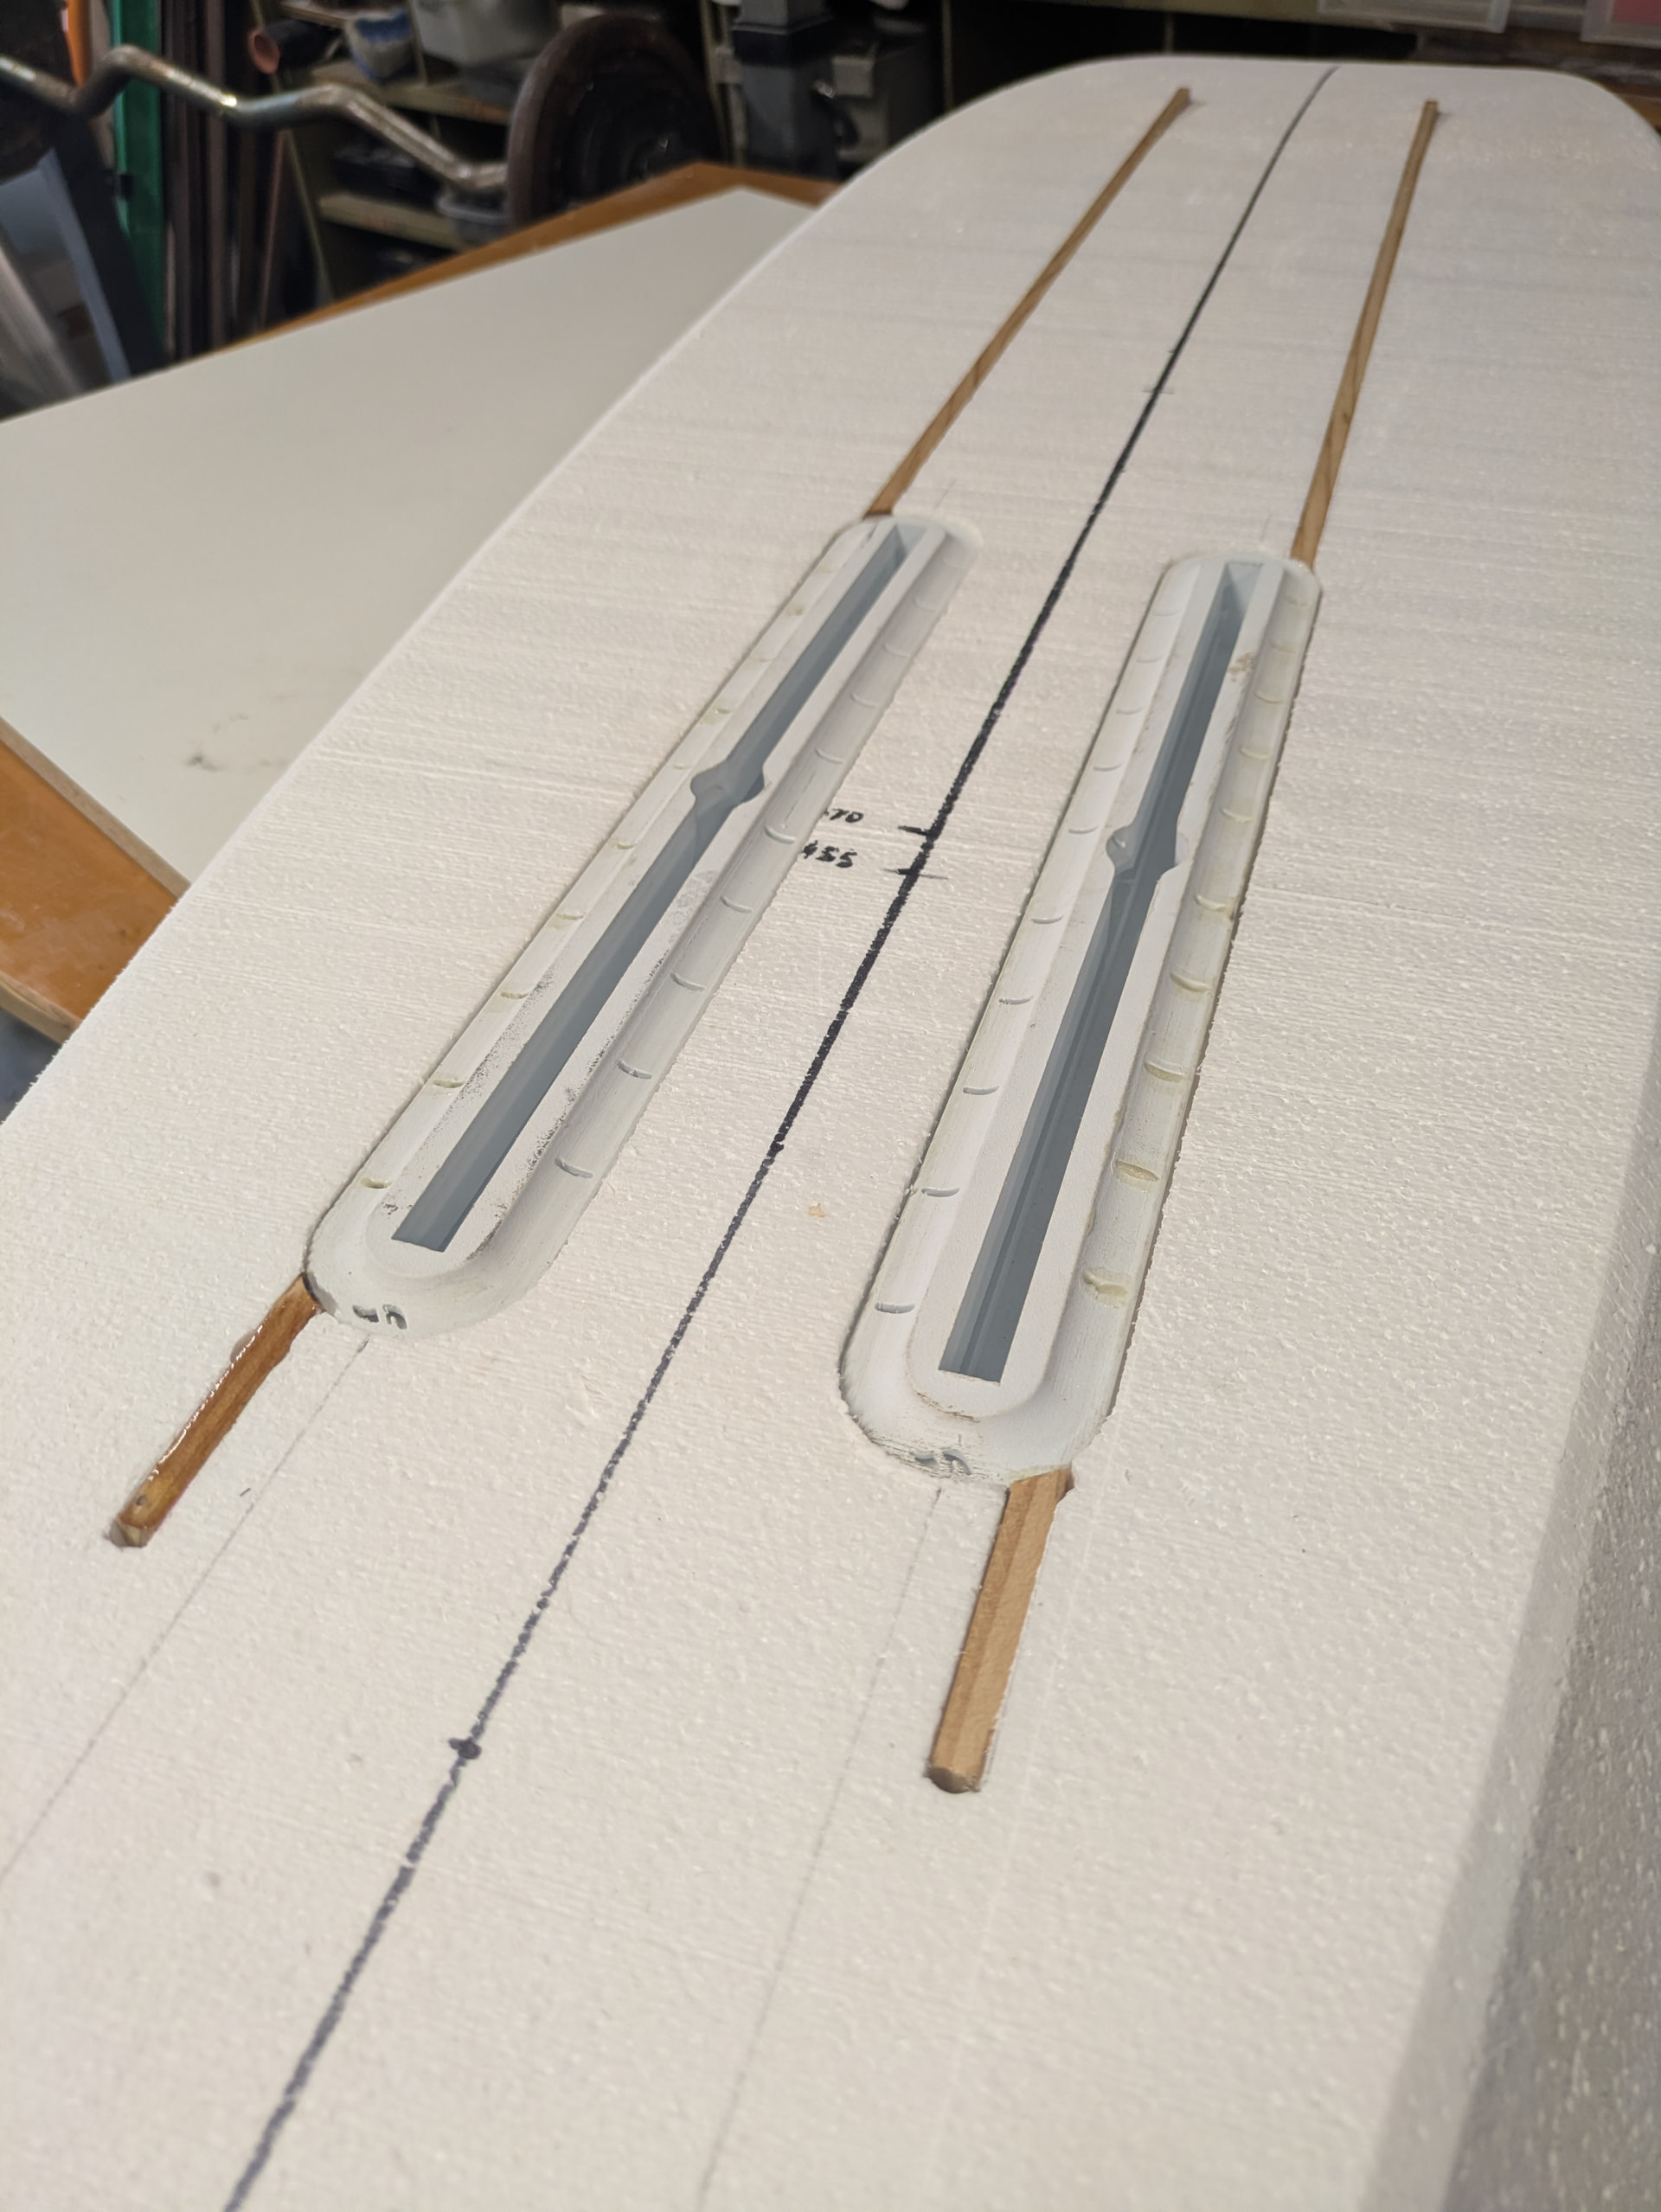
I’m just about to finish my latest board: an XPS SUP foil board based on your OrangeCrush method. For the foil track, I decided to go with two longitudinal inserts running from the middle of the track up to my front foot, plus a small lateral insert behind the boxes to protect them in case I hit the bottom.
I’m conscious that this probably adds a bit more weight compared to the carbon arrow method, but I’m curious to see if I can feel a difference in stiffness(directness?) when pumping. I was inspired by the comment Kane Dewild made about the stiffness advantage underfoot in hollowboard.
How do you install the arrows? Just push it through the blank? I’m sure this works, but just have two concerns:
Arrow shafts creating point loads and either punching through or delaminating the deck.
The weight of a big H80 foam track box that has the same function as what you’re already getting from the mast base plate and bottom patches - keeping the tracks from bending or moving relative to each other.
I’ve used H80 corecell/divinicell pillars (through to the deck) on a few boards now. They hold fixed nuts, but should hold track ends just fine too. Optionally with H80 stringers to the front foot - these get round cutouts to reduce weight Easy to install while building up the blank from XPS sheets (that also get hollowed out in the nose). Probably more difficult to install in a solid EPS blank unless you wire cut it into 3 pieces after shaping?
I’m 96kg and can confirm that a track box just floating in EPS without any rigid ties to the deck does not last long - one more excuse to never buy production boards again.
I use long pine stringers with Futures boxes glued and carbon fibred to them, glued straight into the (13kg) foam. The length of the stringers means the forces are transferred over a very long lever, so they’ve very stiff and bombproof for years. Recently I’ve used little balsa rods, like you’ve been using arrow shafts. Not the lightest, but actually not too bad. I learned the method off Ericfoil.
Let’s say the board is fully shaped and routed to place the track assembly.
Would using cloth to mount the track assembly to the top deck and forward in the board be viable?
Hot wire two stringer cutouts from the front feet to back of the track assembly cavity along the outer edges
Pull cloth through each stringer cutout with about an inch overlap on the top and bottom
Wrap the track assembly in cloth before placing to tie the assembly in to both stringers - the tracks live in a carbon box attached directly to bottom sheet and stringers.
Was thinking of hotwiring the standard low density foam. Would drill entry and exit holes of fairly large diameter.
With the jig in place, thread the cool wire through and hook it up under tension before applying heat (not sure it would get hot enough to cut cleanly without melting a big divot in the foam first). Make the cut and let the wire cool in the exit hole with a fan applied before disassembling cool.
To pull the cloth was thinking of taping the edge to long thin piece of steel.
If I understand your idea, I think it might work better to cut a fully shaped blank lengthwise into three pieces right along the 90mm wide centerline of the two boxes. Then glue back together but with some layers of carbon as stringers (longerons) for the portion under the deck. Those layers could be a bit taller than the blank so they fold over to make an “I-Beam” stringer from the back of the boxes to the front foot area. Much easier than fishing the cloth through a slot and allows good compaction of the cloth/epoxy
Wish all the production boards would reinforce there tracks similarly to Beashos and Espitaka as especially if your in the 100 kg class and up your definatelly blowing boxes/tracks out if not properly reinforced I know this first hand you have to make a solid connection to deck as shown here especially with larger wings we occasionally use these days for heavier riders, trick is to make it strong/light/economical which aint easy but great thread be curious what beasho used for his pillars material wise.Espitaka looks pretty bombproof how’s your boards weights coming out?
hey at least you don’t have to worry about a track/box failure with your reinforcement by the looks of it like to see a picture of your board top/bottom when you get chance what’s your dimensions? Your track reinforcement build looks tops
This is getting away from the foil track discussion, but that black one is 39L, which should be heaps. It’s DW season here, so I haven’t tested it yet.
I think where this is going is because of the tension in the design:
We need the tracks and stand area to be as strong as possible and have 100% of the load transferred through.
The nose and tail need to be as light as possible without crumbling.
I think there’s maybe an interesting angle with a central standing point that is maximally strong, and then you attach a hollow nose and the tail to that, (basically jumping to the end state, rather than bit by bit getting there)